Mastering Commercial Product Photography

Essential Lighting Techniques for E-Commerce
In the competitive landscape of e-commerce, high-quality visual content is no longer a luxury—it is the decisive factor driving conversion rates. Commercial product photography demands consistency, color accuracy, and precise detail. While camera resolution and lens sharpness play vital roles, lighting remains the single most critical component that separates amateur product shots from professional, high-end commercial imagery.
Mastering commercial product photography lighting requires understanding how light interacts with different textures, shapes, and reflective materials. Whether you are capturing matte electronics, luxury cosmetics, or highly reflective glassware, applying structured studio lighting setups ensures your products look appealing, tactile, and true to life.
The Core Pillars of Product Lighting
Before positioning your strobes or continuous lights, it is essential to establish a clear hierarchy of illumination. Every light source in a commercial product setup must serve a distinct purpose:
- Key Light: The primary light source that defines the overall exposure, shape, and main dimension of the product.
- Fill Light: Placed opposite the key light to lift deep shadows and control contrast ratios without creating competing shadows.
- Rim / Hair Light: Positioned behind or above the subject to separate the product from the background, highlighting edges and contours.
- Background Light: Used to illuminate the backdrop independently, ensuring pure seamless whites or controlled gradient shadows.
1. The Softbox Three-Point Setup for Versatile E-Commerce
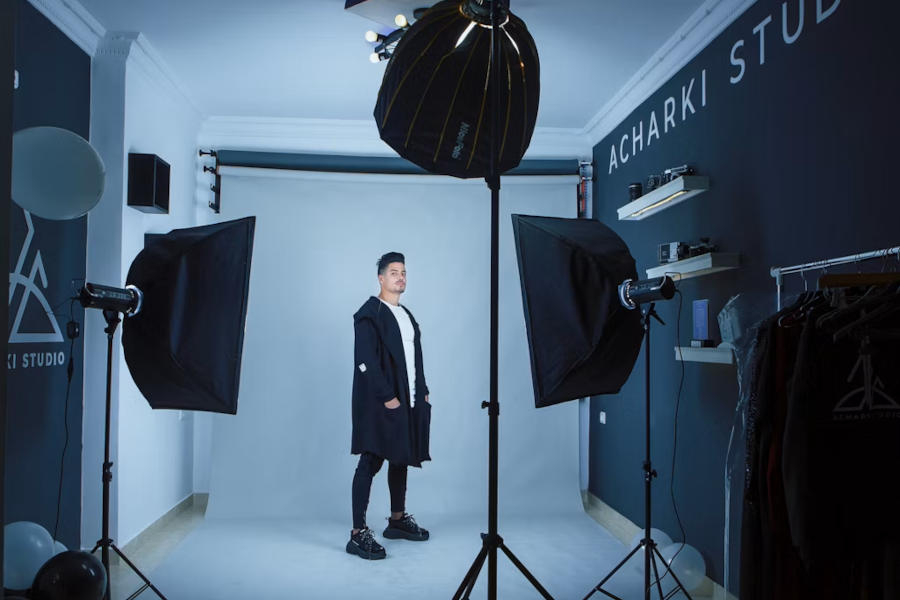
For standard e-commerce catalog photography, predictability and soft illumination are paramount. A classic three-point setup utilizing large softboxes or diffusion panels delivers clean, shadow-softened results suitable for most packaged goods, footwear, and consumer goods.
Position your key light at a 45-degree angle relative to the product, elevated slightly above eye level. On the opposite side, place a fill light at half the power intensity of the key light—or use a white foam core reflector board to bounce light naturally back into the shadows. Introduce an overhead boom-mounted softbox (a “top light”) to cast an even glow over the entire product surface and eliminate harsh specular highlights on top edges.
2. Managing Reflective and Metallic Surfaces
Photographers often face challenges when dealing with reflective products such as jewelry, stainless steel cookware, or perfume bottles. Direct flash units cast harsh specular hotspots, turning polished metal into black-and-white high-contrast visual noise.
To overcome reflection issues, shift your focus from lighting the product directly to lighting the environment around the product:
- Diffusion Tents & Scrims: Surround the product with large diffusion scrims or translucent acrylic sheets. Aim your strobes at the outside of the scrims so the product reflects smooth, continuous white gradients rather than small light sources.
- Black Cards (Negative Fill): Position black poster boards or flags just outside the frame. The reflective surfaces will pick up these dark edges, defining the product’s geometry and giving metallic edges a crisp, high-end look.
3. Hard Light vs. Soft Light: Choosing the Right Mood
While soft, diffused light is the gold standard for standard e-commerce listings, hard light has made a massive comeback in editorial and lifestyle commercial photography. Direct sunlight simulation using bare reflectors, snoots, or optical spotlights creates sharp, dramatic shadows and vivid color saturation.
Hard lighting works exceptionally well for summer-themed cosmetics, beverage photography, and tactile accessories where dramatic shadows add storytelling elements and emotional resonance.
Essential Gear Recommendations for Commercial Studios
Building a reliable studio workflow requires investment in controllable, color-accurate gear. Key recommendations for modern e-commerce studios include:
- Monolights / Strobes: Minimum 200W-400W with stable color temperature (±50K variance).
- Continuous LED Panels: High CRI/TLCI (>96) for real-time shadow monitoring and video integration.
- Modifiers: Stripboxes with grids (30x120cm) for edge control, Octaboxes for soft fills.
- Support: Heavy-duty C-stands with boom arms for overhead top-lighting.
Conclusion
Achieving outstanding results in commercial product photography is not about accumulating the most expensive gear—it is about mastering the physics of light control. By understanding how key lights, fill cards, diffusion panels, and negative fill shape a subject, photographers can elevate standard product shots into compelling, high-converting visual assets.
Photo: Aziz Acharki